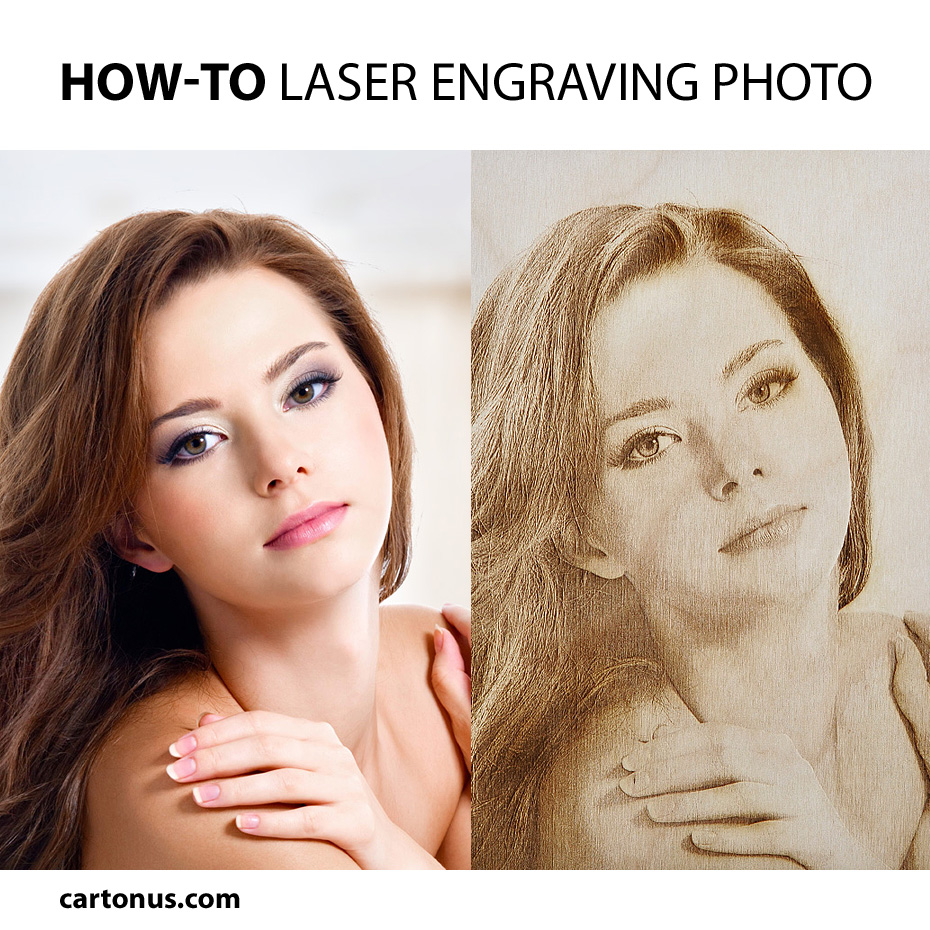
I want to tell you how we engrave photos on a laser machine. After various tests, trial and error, born algorithm that allows you to get good quality engraving.
Step 1: Excellent Quality Photo
Use photo only excellent quality.
Open in Adobe Photoshop.
Step 2: Crop Photo
Crop photo as you need. Crop Tool (C)
Step 3: Remove Background
Carefully remove background.
Use Polygonal Lasso Tool (L) Feather 0px, Anti-alias.
Make a white background, merge layers (Ctrl+E)
Step 4: Convert Photo to Grayscale
Image > Mode > Grayscale
Step 5: Edit Photo
Large dark areas of photos light.
The intensity of black color on face should be 10-15%.
The eyes should be almost white. Black 3-6%.
Light hair strands create more light. Dodge Tool (O) Range: Highlights.
Dark hair strands darken. Burn Tool (O) Range: Shadows.
Step 6: Image Size
Resolution: 200 pixels/cm (508 pixels/inch)
Step 7: Sharpen
Filter > Sharpen > Unsharp Mask
Amount: 200 % Radius: 1 pixels Threshold: 0 levels.
Make sharper eye, eyelashes, eyebrows, lips, hair using Sharpen Tool.
Step 8: Convert Image to Bitmap
Image > Mode > Bitmap
Output: 200 pixels/cm (508 pixels/inch)
Method: Halftone Screen Frequency: 200 lines/cm (508 lines/inch)
Angle: 15 degrees
Shape: Round
Save As Format: BMP File
Format: Windows
Depth: 1 Bit
Step 9: Eye
Cut a piece of image for tests.
Eye – the best choice
Step 10: Laser Program
Import BMP image to RDWorks (or other your laser program).
Wood fibers should be parallel to the long axis (X).
Image as well.
Rotate image 90 degrees if necessary.
Set parameters for engrave
• Parameters for 40 watt power laser (Program: RDCAM)
• Speed(mm/s): 300 Max
• Power(%): 20
• Interval(mm): 0.05
Material: solid birch, plywood birch
Speed and power must be chosen by experimentation.
Video
We use plywood birch in main.
It is accessible and cheap material.
Sand the plywood and cover it with varnish.
After engraving, wipe product with damp sponge to remove the soot and dust.
Step 12: Result
Wood luck!
Read on Instructables
where this setting tool?
Large dark areas of photos light.
The intensity of black color on face should be 10-15%.
The eyes should be almost white. Black 3-6%.
Light hair strands create more light. Dodge Tool (O) Range: Highlights.
Dark hair strands darken. Burn Tool (O) Range: Shadows.
Tools described for Adobe Photoshop.
Use Eyedropper tool to check intensity of black color.
can you send the setting Laser engraving photo video learning
We will make video tutorial about Laser engraving photo
Hello, thank you for sharing this engraving method with others, I have a RUIDA controller, that’s why I really liked the final work you get with a similar machine, I think your work is fantastic, so I think it would help a lot to have some Additional guideline from photoshopped photo setup work
Hello, what is the dpi that you are using? Is it the same as 200px that you have specified for the image resolution?
Output: 200 pixels/cm (508 pixels/inch)
Very informative tutorial. Will try a couple of test runs with your recommended settings and check the results. Thanks.
I have a laser engraver I just finished putting together. No instructions on how to install the software or driver. It’s a 3000MW Blue CNC. I really need a step by step instruction if you have a video that specifically writes out the website and is user friendly. Thanks for any help. I’m a Vietnam Veteran and need things that are not too technical so I can follow step by step.
I found video and instruction about your laser machine.
You can use our free designs for first.